Business Central Personalization: Customize Your Pages and Screens
Microsoft Dynamics 365 Business Central gives users a lot of flexibility when it comes to how information is displayed on the screen. With the Personalize feature, you can move, hide, add, resize columns, and more, to create a layout that works best for you. These changes can be made without any development or assistance from an administrator, making personalization a quick and easy way to simplify your Business Central experience. In this guide, we’ll walk through how to personalize your screens in Business Central and show some of the most useful ways to customize your pages. You can enter personalization mode from any page in Business Central and still navigate normally while customizing.
How to Start and End Personalization Mode
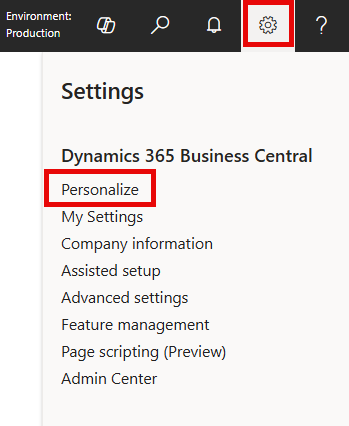
To enter Personalization mode, click on the Settings ⚙️ icon in the top right corner, then select Personalize. Once you finish with your changes you click the Done button to leave personalization mode.
Important Note: Changes you make in personalization only affect your account and won’t alter other users’ screens. If you want to make changes for a group of people that share the same profile, checkout my other guide: Business Central User Profiles (Roles) and Field Level Security
How to Move Fields
Click and hold any column or field, then drag it to your desired location. You will see a solid red line indicating where it will be placed (columns will show a vertical red line, and page fields will show a horizontal one). Release to move the field to that spot.
How to Add Fields
To add a field, click the +Field button at the top left while in personalization mode. This opens the Add Field to Page panel on the right, showing all available fields not displayed on your screen. You can add a field in two ways.
- Click a field in the Add Field to Page section, and it will be added to your view with gray slashes through it, indicating it hasn’t been fully added yet. You can then drag it to your desired location or click the red triangle and choose Show if it’s in the right place.
- Click and hold on a field in the Add Field to Page section, then drag it to your desired location. Release the click when you see the solid red line to add the field.
How to Hide Fields
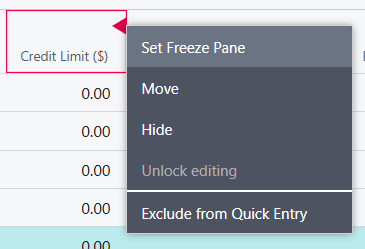
Hover over the field or column you want to hide and click the red triangle in the top right corner. Select Hide from the menu that opens to remove the field. Hiding won’t delete any information in Business Central, and you can add the field back later if needed.
How to Set a Freeze Pane
Like in Excel, you can add a Freeze Pane to your columns to keep the leftmost ones visible while scrolling. This is very useful when there are many columns that require scrolling and you want to still see certain information.
Additional Personalization Options
- Show Always & Show When Collapsed: Tired of clicking Show More to see fields in Business Central? You can set a field to Show Always in personalization. If you need to see a field only sometimes, set it to Show When Collapsed to view it by clicking Show More.
- Lock/ Unlock Editing: This allows you to lock (allow editing) or unlock (prevent editing) of fields on a page directly in Business Central.
- Include/ Exclude from Quick Entry: When you use the ENTER key to move between fields this setting determines which fields you skip. It skips fields marked as Exclude from Quick Entry and Locked fields. A feature that can be used for faster data entry.
How to Reverse Personalization on Pages
Did you go a bit overboard with your personalization and hide some important fields? Or perhaps you’re unhappy with your changes and find your job harder? Fortunately, there’s a simple way to undo the personalization you applied to your user. Go to the page you want to reverse and choose the Clear Personalization… button where you’ll have the following options:
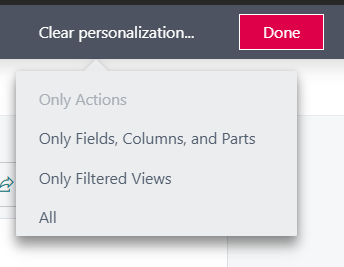
- Only Actions: This reverses any changes you did to the actions which are the menus as the top of the list or page you’re on.
- Only Fields, Columns, and Parts: Everything else.
- Only Filtered Views: Any saved views you created on a list page.
- All: The “Everything is messed up and I need to start over” button. 😂

Thank you for reading, I hope you learned something new.
As always, stay SAASY my friend.
-Dino


Leave a comment