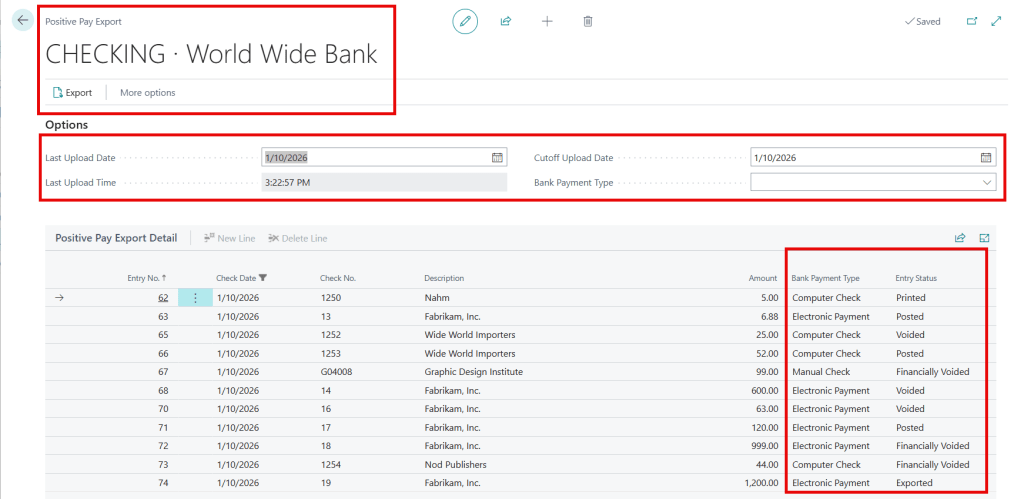
This article explains how to configure fixed or variable text files for positive pay exports in Business Central—an essential step to prevent check fraud and ensure secure transactions. By the end, you’ll know how to set up these exports efficiently to protect your financial assets. After that, you can follow this guide on how to use it: How to Process Positive Pay Files in Business Central
Only Four Essential Steps for Positive Pay Setup
- Bank Requirements: Positive pay structures vary by bank. Contact your bank to ask about file setup and required fields.
- Create a Data Exchange Definition: Match the Business Central export file fields to the bank’s requirements.
- Bank Import/ Export Setup: Create a new code and link it to the data exchange.
- Update the Bank Account Card
Data Exchange Setup

General Section
- Code and Name: If you need help with this one, you’re in trouble…
- File Type: Fixed Text or Variable Text depending on the type of file your configuring
- Type: Positive Pay Export
- Validation Codeunit: 1701
- Reading/ Writing Codeunit: 1708
- Reading/ Writing XMLport: 1231
- Ext. Data Handling Codeunit: 1709
- User Feedback Codeunit: 1710
- File Encoding: WINDOWS
- Column Separator: If it’s Fixed Text, it will be greyed out and you can’t enter anything. If it’s Variable Text, choose from Tab, Semicolon, Space, or Custom. Avoid using Comma as a separator, as vendor names may include it, causing issues. If using Custom, enter the separator in the Custom Column Separator field below.
Line Definitions
- Line Type: Detail
- Code and Name: Up to you my friend…
- Column Count: Number of columns your file contains. In this example, I have 8.
Column Definitions
Here you add the columns you wish to export from Business Central into the Positive Pay file.
- Column No.: The position of the column.
- Name: Description for the field.
- Data Type: For this type of file, we only need to use Text, Date, and Decimal.
- Data Format for Dates: <Year,2><Month,2><Day,2>
- Data Format for Decimal: <Precision,2:2><Standard Format,0>
- Data Formatting Culture: en-US for US formatting of dates and decimals.
- Length: Set a character length based on the banks file requirements.
- Constant: Sometimes banks have required values that must always be the same and here’s where you’d define that. In this example, the first column is a “Record Code” that tells the bank what kind of file is being imported, and it always needs to be 99.
- Text Padding Required: Select this if padding is needed. Specify the Pad Character to fill blank spaces and choose whether to justify the text Left or Right.

Field Mapping
After completing the above sections, you need to map the Column Definitions to the related fields in Business Central.

- Select the Field Mapping button in the Line Definitions section.
- Table ID: 1241
- Pre-Mapping Codeunit: 1704
- Mapping Codeunit: 1705
- Use the dropdown in the Column No. field to select a column. Then, in the Field ID, map it to the corresponding Business Central field. For constant fields (like “Record Code” in my example), you don’t need to add them to this field mapping page.
- Optional: Choose this for columns that might not always have a value, such as a void check indicator for voided checks. If not selected, the import will fail for empty values. For instance, amount is optional because the test print option from the payment journal can create a zero-dollar entry that appears blank on the export, leading to an error if it isn’t marked as optional.
- Transformation Rule: Some columns need special formatting. In this case, the bank requires the amount to exclude commas, so I’ve created a “Replace Text” rule to remove them.

Bank Export/ Import Setup

- Code and Name: Your choice
- Direction: Export-Positive Pay
- Processing Codeunit ID: 1700
- Data Exch. Def. Code: Select the data exchange we previously created
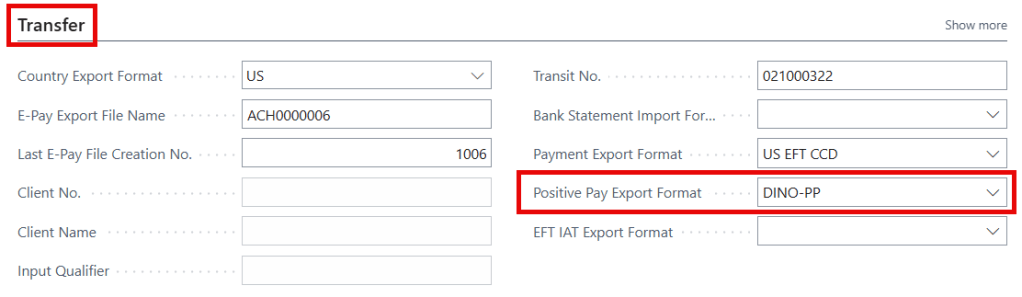
Final Step: Add to the Bank Account Card
To finish, open the Bank Account Card and add our new code in the Positive Pay Export Format field found in the Transfer section.

Last Note: Data Exchange Definitions are also used for importing payroll files and importing bank reconciliations. Now you’re ready to use the export, let’s see this in action! 😊
Thank you for reading, I hope you learned something new.
As always, stay SAASY my friend.
-Dino


Leave a comment